20+ Years Experience
Specialist Oil Tank Replacement
Enquire Today For A Free No Obligation Quote
Are you considering installing an oil tank in your home? Before diving into the process, it is crucial to prepare your home for the installation. From choosing the right location to checking for permits and scheduling professional inspections, there are several steps to consider.
In this article, we will explore the importance of oil tank installations, the different types of oil tanks available, and the steps involved in the installation process. Stay tuned to learn everything you need to know about preparing your home for an oil tank installation.
Oil tank installation refers to the process of setting up a container to store heating oil securely and efficiently on a property, following specific guidelines and regulations, often overseen by organisations like OFTEC.
Heating oil is a crucial component in many homes and businesses, providing warmth during cold seasons. The installation of oil tanks is essential for ensuring a steady and reliable fuel supply, especially in regions where other heating options might not be as practical or cost-effective.
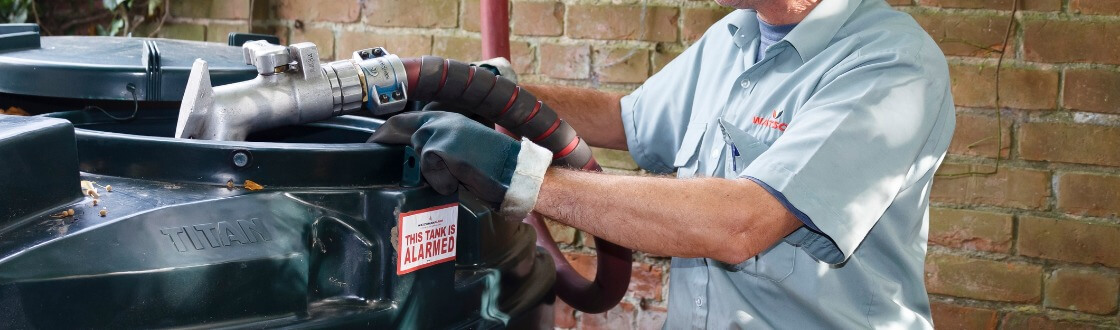
Safety considerations, such as proper earthing, tank material, and leak prevention mechanisms, play a significant role in preventing accidents and environmental damage.
Compliance with regulations set by authorities like the Environmental Protection Agency (EPA) is vital to avoid fines and ensure the tank’s longevity. Professional installation not only guarantees adherence to regulations but also ensures that the tank is placed in the most suitable location for efficient heating distribution.
An oil tank installation is essential for homes using heating oil as a primary fuel source, ensuring a reliable and safe supply of fuel for heating systems, whilst complying with installation regulations and standards set by organisations like OFTEC.
Proper oil tank installation is not just about having a container for oil storage; it involves careful planning, positioning, and maintenance to prevent leaks, contamination, or other safety hazards.
A correctly installed tank reduces the risk of environmental damage and health issues associated with oil spills. It also ensures efficient fuel delivery to the heating system and prevents potential fire hazards.
By following industry guidelines and regulations, homeowners can avoid costly repairs, insurance issues, and legal consequences related to improper oil tank installations.
Preparing for an oil tank installation involves several key steps, including:
When timing a professional inspection, ensure that the service provider has experience in dealing with oil tank installations and is licensed for such tasks.
Safety is paramount during the whole process; make sure the delivery of the tank is well-coordinated, and all safety measures are in place before the installation begins. Professional service not only guarantees a successful installation but also ensures compliance with all legal requirements and standards set by local authorities.
Selecting the optimal location for your oil tank installation is crucial, taking into account factors such as proximity to the heating system, accessibility for deliveries, and compliance with regulatory guidelines.
When deciding on the placement of your oil tank, it’s essential to ensure that it is situated in a convenient location relative to your heating system. Placing the tank too far away can lead to inefficient heating and potential operational issues. Adequate access for oil deliveries is paramount to prevent any disruptions in supply.
Meeting installation regulations is a non-negotiable aspect that guarantees safety and adherence to industry standards. By carefully considering these aspects, you can optimise the efficiency and functionality of your oil tank system.
Clearing the designated area for the oil tank installation involves removing any obstructions, debris, or vegetation to create a level and stable foundation for above-ground or ground-level tanks.
Before starting the excavation process, carefully assess the area to ensure it meets the requirements for safe installation. A clean and level surface is crucial to prevent any shifting or damage to the tank over time, especially in the case of ground tanks.
Make sure the ground is free from rocks, tree roots, and any other objects that could interfere with the tank’s stability. Consider the drainage in the area to avoid water pooling around the tank. Once the area is clear, mark the dimensions for the tank footprint to guide the installation process.
Before proceeding with the oil tank installation, it is essential to verify and acquire any necessary permits or approvals required by local regulations and authorities to ensure compliance with safety and environmental standards.
Obtaining the licences and following the regulatory compliance guidelines not only prevents legal troubles but also plays a crucial role in safeguarding the environment and public health.
Failure to adhere to these regulations may result in fines, penalties, and even the need to dismantle the tank if installed without the necessary approvals. Local authorities often have specific requirements regarding the location, size, and material of oil tanks to minimise risks of leaks, spills, or contamination.
Arranging a professional inspection before the oil tank installation is crucial to verify the site’s suitability, assess any risks or challenges, and ensure that the installation process meets safety standards and regulatory requirements.
Engineers play a critical role in conducting meticulous site evaluations to determine the most suitable location for tank installation.
Through rigorous risk assessments, these professionals identify potential hazards and develop strategies to mitigate them effectively. Professional service ensures that installations adhere to industry best practices, minimising the likelihood of leaks, spills, or other safety hazards.
Oil tanks come in various types, including steel and plastic models, each offering distinct advantages such as durability, corrosion resistance, and suitability for different installation environments.
Steel tanks, known for their robust construction, are ideal for outdoor installations due to their ability to withstand harsh weather conditions. They are particularly favoured for their longevity and fire-resistant properties, making them a popular choice for commercial applications.
On the other hand, plastic tanks are lightweight and easier to transport and install, making them suitable for residential use or areas where space is limited. They are also corrosion-resistant, significantly reducing the risk of leaks or environmental contamination.
Above-ground oil tanks are commonly used for domestic heating systems, providing easy access for maintenance, inspection, and refilling, making them a favoured choice for many homeowners.
One of the main benefits of above-ground oil tanks is the ease of installation they offer. These tanks are usually quicker to install compared to underground choices, as there is no need for digging or excavation. Their above-ground positioning enables simpler monitoring of the tank’s status, making it easier to identify any potential problems at an early stage.
Underground oil tanks are installed below ground level, providing a discreet and space-saving solution for heating oil storage, although they require careful installation to prevent leaks and environmental contamination.
Given their hidden placement, underground oil tanks are commonly favoured for properties where above-ground storage is impractical or unwanted.
Their installation can pose challenges due to the need for excavation and proper venting to prevent soil and groundwater contamination. Implementing effective leak prevention measures, such as regular monitoring and maintenance by trained professionals, is crucial to safeguard against potential environmental hazards and ensure the longevity of the tank system.
Basement oil tanks are positioned within a property’s basement area, offering a convenient and sheltered location for heating oil storage, requiring regular maintenance to ensure safe operation and prevent leaks.
These tanks are typically made of steel, providing durability against corrosion and impact. Due to their indoor placement, they are shielded from external elements, reducing the risk of damage from weather conditions.
Regular inspection and cleaning are essential to detect any potential issues early on and maintain the tanks’ integrity.
In terms of maintenance, checking for signs of rust, monitoring for leaks, and ensuring proper ventilation are key tasks. In addition, scheduling professional inspections and cleaning services can help extend the lifespan of the tank and ensure its safe use for heating purposes.
Outdoor oil tanks are installed outside properties, providing ample storage capacity for heating oil while requiring appropriate safety measures to protect against environmental factors, such as weather and potential tampering.
When considering the outdoor placement of these tanks, it’s essential to ensure they are positioned on a stable, flat surface away from areas prone to flooding or drainage issues.
Additionally, outdoor oil tanks should be placed at a safe distance from buildings and property lines to meet regulatory requirements and minimise fire hazards. Safety considerations include securing tanks with protective enclosures to prevent unauthorised access and safeguarding against potential leaks or spills.
The oil tank installation process involves several key steps, including site preparation, tank delivery and placement, the actual installation of the tank, and connecting it to the property’s heating system for efficient fuel delivery and combustion.
The initial step in the oil tank installation process involves preparing the site by ensuring a stable and level ground for the tank placement, and addressing any potential obstacles or hazards that may affect the installation.
A level surface is crucial to prevent future stability issues and potential leaks, ensuring the tank functions properly. Clearing the area from debris, rocks, and other obstructions is necessary to create a safe environment for the tank.
Hazard mitigation plays a vital role in site preparation, such as considering proximity to flammable materials or drainage systems that could impact the tank’s stability.
When positioning ground tanks, factors like accessibility for refilling, distance from buildings, and local regulations come into play. Proper spacing and ensuring level installation are essential to avoid any structural complications or environmental risks.
After site preparation, the oil tank is delivered to the property and carefully placed in the designated location, following specific guidelines and standards set by organisations like OFTEC to ensure a safe and efficient installation.
Once the delivery process begins, it’s crucial to have a clear pathway for the tank to be manoeuvred into place, avoiding any obstacles or impediments.
The delivery team typically uses specialised equipment to transport the tank safely to its destination, ensuring minimal risk of damage or accidents during the placement process.
Upon arrival, the tank is positioned with precision, considering factors like proximity to buildings, accessibility for refills, and adherence to local regulations. Compliance with industry standards is prioritised to guarantee that the tank is securely and legally installed.
The actual tank installation involves securely fitting the oil tank in place, connecting it to the heating system, and ensuring proper seals and connections for the efficient delivery of heating fuels to the combustion chamber.
One crucial aspect of securing the oil tank in place is to ensure that the surface underneath is level and stable to prevent any potential leaks or damage. It is imperative to use appropriate fittings and connectors to establish a seamless connection to the heating system, allowing for a smooth flow of heating fuels.
Applying the right sealant and inspecting all joints thoroughly is vital to prevent any leaks or pressure loss during fuel delivery. Proper ventilation around the tank is also essential to optimise combustion efficiency.
The final step in oil tank installation involves connecting the tank to the property’s heating system, integrating components such as smart gauges or alarms to monitor fuel levels and ensure efficient heating fuel management.
When connecting the oil tank to the heating system, it is crucial to ensure that the pipes are correctly aligned and securely fastened to prevent leaks and wastage of fuel.
This integration process typically involves coordinating with the heating system manufacturer’s guidelines to ensure compatibility and optimal performance. Smart gauges play a key role in this setup, providing real-time data on fuel levels and consumption, allowing homeowners to track usage and plan refills efficiently.
Alarms can be programmed to alert users when fuel levels are low, helping to avoid unexpected interruptions in heating during colder months. Efficient heating fuel management not only saves costs but also contributes to environmental sustainability by reducing unnecessary energy consumption.
[catlist name=”blog”]
We Aim To Reply To All Enquiries With-in 24-Hours